


VPC peering
If your infrastructure is deployed on AWS, you can create VPC peering connections and benefit from the private network between your VPCs on AWS and the underlying VPC of your Environment in which your GrapheneDB databases are deployed.
By doing this, the traffic between your infrastructure and your databases can be routed through private IP addresses instead of public, while keeping the Environment and its databases protected from public network traffic. It can also greatly help in reducing latency, lowering packet loss, and having a higher speed.
⚠️ Important
Please ensure that the IP address range of your Environment does not overlap with the subnets in use in your AWS VPCs. You can check that here. You’re choosing the IP address range when creating the Environment.
Choosing an IP address range
When creating a VPC peering, selecting the suitable IP address range is critical for private routing.
Databases deployed within an Environment will be assigned a private IP address from the IP address range configured. Traffic is directed to this private IP address when accessed from a fully configured peer VPC. When not accessed through a peering VPC, traffic is redirected to the public IP address, rendering the database server’s private IP address obsolete.
As a result, if you intend to use VPC peering for private networking, it is critical that you select an IP address range that does not overlap with any other address range in your installations.
The IP address range is a group of IPv4 addresses organized as a Classless Inter-Domain Routing (CIDR). IPv6 is not presently supported.
The available IP address ranges are in the 172.x.y.z/n address space, where:
- 16 ≤ x ≤ 31
- 16 ≤ n ≤ 25
Not allowed:
- 172.28.0.0/16
- 10.100.0.0/16
Good options are:
- 172.19.0.0/16, 172.21.0.0/16, 172.23.0.0/16, 172.25.0.0/16, 172.27.0.0/16, 172.29.0.0/16, 172.31.0.0/16
Bad options are:
- 172.16.0.0/16 - heavily used
- 172.17.0.0/16 - Docker’s default
Creating a new VPC peering connection
To create a new VPC peering connection in the respective Environment, navigate to the Network Access tab > + Add new peering connection.

When you click on + Add new peering connection, you’ll be prompted to a new screen where you’ll need to add:
- Choose Name - The name that you’d like to use for the peering connection.
- AWS Account ID - The ID of the AWS account where the VPC to peer with is hosted. More details on this can be found here.
- VPC ID - The ID of the VPC to peer this Environment with. More info on this can be found here.
- Select AWS Region - We support inter-regional peering.
- Please make sure to add the region of your VPC in case it’s not in the same region as the GrapheneDB Environment.
ℹ️ Info
When naming a peering connection these conditions must be met:
- At least two characters long.
- At most thirty characters long.
- Can only contain alphabetical characters, numbers, underscore or dashes.

Once added, please click on Confirm button to initiate the peering request. You should see the newly created peering request in the VPC peering section in a pending status.

Now you’ll need to accept the peering request in your AWS console. You’ll find the request under the Peering Connections section on the VPC page. You can find more info on this here.
After accepting the request you should see active in the VPC peering section of your GrapheneDB Console.

ℹ️ Info
If you have already approved the request in your AWS Console, you can force updating the status by clicking on refresh icon.

Inter-regional peering
We support Inter-regional peering, which means that you can establish pairing relationships between VPCs between different AWS regions in case you have different services that are deployed across different regions and you want to connect to only one Environment.
How to find your AWS account ID
You’ll find it by clicking on your AWS account name in the navigation bar of your AWS Management console in the upper-right corner. Your account ID will appear in the drop-down menu.

How to find your VPC ID
To find your VPC ID, please navigate to VPC Dashboard > Your VPCs in your AWS Management console, and copy the ID under the VPC ID column.

How to accept a peering connection on AWS
Navigate to VPC Dashboard in your AWS Management console and click on Peering Connections. You should see the newly created request from GrapheneDB. Select the request and then choose Accept Request from the Actions drop-down menu.

ℹ️ Info
While the VPC peering connection request awaits acceptance from the owner of the accepter VPC, the owner of the requester VPC can delete the request, and the owner of the accepter VPC can accept or reject the request. If no action is taken on the request, it expires after 7 days.
Configuring the peered VPC for private routing
Once the VPC peering connection has been created, connecting the remote VPC with the underlying VPC of your Environment will require further configuration in order to work.
ℹ️ Info
We support multiple CIDR ranges inside one VPC peer.
The remote VPC’s network routing table needs to be updated to include a route to the Private Network’s subnet, and private DNS resolution needs to be enabled, so that network traffic relies on private instead of public IP addresses.
Please complete the following steps to configure the peered VPC for private networking:
-
Open the Amazon VPC console following this link and navigate to the VPCs.
-
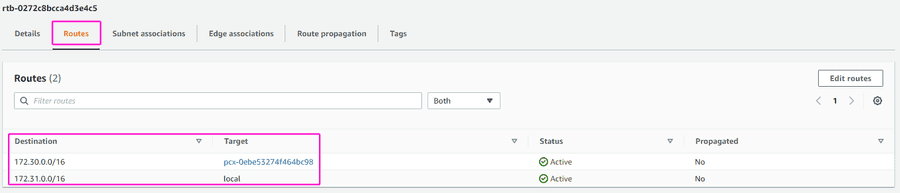
Next, go to the Routes table section on the left-hand side of the AWS console and click on the Route table ID you’re using for this VPC peering. Then, please click on Edit routes.

Add a new route where Destination should be GrapheneDB Environment IP address range (Requester VCP CIDR) and Target should be a peering ID. Click on Save changes.

Once that is done, when you select the desired Route table ID and click on the Routes tab, you should be able to see it in the targets list: pcx-xxxxxxxx (with the Destination of GrapheneDB Environment IP address range).
-
Now, in the AWS navigation pane, choose Your VPCs > select the VPC ID you’re using for this setup, and choose Actions > Edit VPC settings.

Enable DNS resolution and DNS hostnames, so that any hostnames for databases in the Environment resolve to their private IPs. Click on Save Settings.

-
Finally, navigate to the Peering Connections on the left-hand side menu, select the Peering connection you used, and go to Actions > Edit DNS Settings.
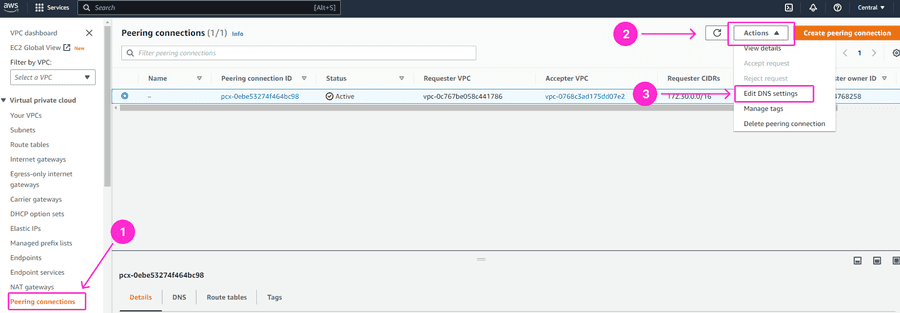
Tick the checkbox Allow requester VPC (vpc-xxxxxx) to resolve DNS of accepter VPC (vpc-xxxxxx).


You can find more information on these topics in the AWS documentation:
Managing VPC peering connections
If there are any VPC peering connections, these will be displayed in the Network Access section > VPC Peering Connections of the selected Environment.
For every VPC peering connection, the following details are displayed:
- Label: The display label chosen for the VPC peering connection.
- AWS account ID: The ID of the AWS account where the VPC to peer with is hosted.
- VPC ID: The ID of the peered VPC.
- Status: This will reflect the current status of the VPC peering connection. Peering requests pending acceptance are refreshed regularly.

VPC Peering Connection status
When a VPC Peering Connection is created, the status will transition from Pending, to Active or Failed.
Pending status
If the VPC Peering Request is created successfully, it needs to be accepted on the peering side, in order for the connection to be finally established.
Once the VPC Peering Request has been accepted, the status will transition to Active.
Active status
If the VPC Peering Connection has been accepted on the peering side, the connection becomes active.
Please keep in mind that even when the status is displayed as Active, some configuration is needed on the peering side in order for private networking to function properly. For instructions on configuring the peered VPC for private networking please check this section.
Failed status
If AWS fails to create the VPC Peering Connection, its status will be displayed as Failed.
The VPC peering connection can fail for the following reasons:
- the Environment and the peering VPC have overlapping IPv4 CIDR blocks, or
- the AWS account ID and VPC ID are incorrect or do not correspond with each other
If the VPC peering connection fails, try resolving the issue and creating a new VPC peering connection again. Failed VPC peering connections are not automatically deleted. You can do this manually by using the trashcan icon on the right-hand side of the peering connection.
Deleting a VPC peering connection
To delete the peering connection, click on the trashcan icon on the right-hand side of the respective VPC peering connection.

A confirmation window will appear, where you’ll need to enter the name of the peering connection, and click on the Delete Peering Connection button.
Deleted VPC Peering Connections cannot be recovered. To connect to the same VPC, please create a new VPC Peering Connection.
